本文共 7486 字,大约阅读时间需要 24 分钟。
参考资料
- RFID-RC522 模块
- Arduino教程-17 RFID无线识别设备
RFID-RC522 模块
【文章特色:1、提出IC卡破解原理和简单有效的防御方法2、网上其他文章对于硬件如何接线说得模糊不清】
1、序言
先说下简单门禁系统的原理:(1)IC卡激活:门禁卡管理员将卡片放到读卡器、这时软件读取到IC卡的UID序列号信息(相当于身份证号码),将这个UID录入数据库激活IC卡。
(2)刷卡:刷卡时读卡器读取到UID,查询数据库,如果数据库中存在这个UID则表示有效用户,继而控制继电器断电,此时电磁锁开门。

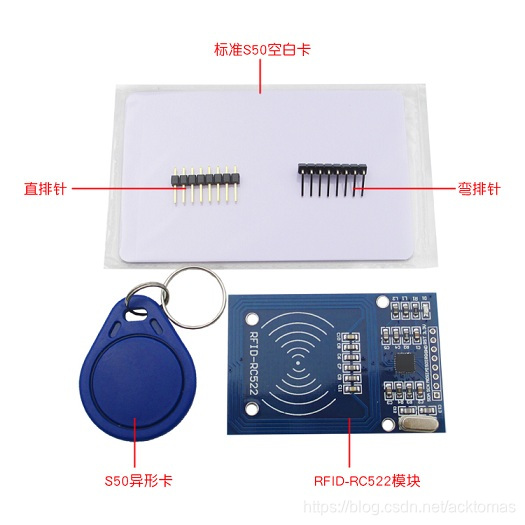
不亦买的RC522模块采用SPI通信、据说也有串口通信的不过成本较高。大家可以看看这个模块的主要配件:卡和读卡器。
2、加载RC522库文件
Arduino本身有个操作RC5200的库,如下图所示,打开Arduino开发工具中管理库
搜索"RC522",选择"MFRC522"安装即可
点击"More info"可以跳转到github地址https://github.com/miguelbalboa/rfid ,下文会有提及。
安装完毕后,可以看到关于MFRC522的库示例,有读取UID、获取区块信息、修改UID、卡片信息复制等
注:一般而言IC卡是不能修改0扇区0区块的UID和厂商信息数据,这些是生产时就确定下来的的(关于IC卡的存储结构有空再发文介绍,小伙伴们可以去网上查阅这方面资料也挺多的),能够全扇区修改的俗称UID卡才支持修改UID,一些不负责的门禁系统厂家仅根据UID来判断用户身份是不可靠的,一个简单的方法是在读之前先写UID操作,如果可写那么这张卡就是UID卡即复制卡,判断无效,系统也可记录是哪张IC卡被复制了用于追溯非法行为,仅供交流与学习,请勿用于非法用途哦
3、模块引脚接线
此处是网络上大部分相关文章没有提及的,只告诉了如何接线,却不告诉我们为什么这样接,甚至连Arduino版本都不说清楚。我们打开ReadNUID的示例里面有各种版本Arduino与RC522的引脚连接图,我们按照这个接线即可。在上文提及的github项目主页也有介绍。
RC522一共8个引脚,如图所示:

3.3V供电、GND接地不用多说,IRQ是中断才用到的此处没有用到可以不接,其余5个引脚接法如下表所示:
Typical pin layout used:
| MFRC522 | Arduino | Arduino | Arduino | Arduino | Arduino |
|---|---|---|---|---|---|
| Reader/PCD | Uno/101 | Mega | Nano v3 | Leonardo/Micro | Pro Micro |
| Signal | Pin | Pin | Pin | Pin | Pin |
| RST/Reset | RST | 9 | 5 | D9 | RESET/ICSP-5 |
| SPI SS | SDA(SS) | 10 | 53 | D10 | 10 |
| SPI MOSI | MOSI | 11 / ICSP-4 | 51 | D11 | ICSP-4 |
| SPI MISO | MISO | 12 / ICSP-1 | 50 | D12 | ICSP-1 |
| SPI SCK | SCK | 13 / ICSP-3 | 52 | D13 | ICSP-3 |
*/
4、程序代码
此处测试的Arduino型号是Arduino Nano V3.0,其他型号请结合上表修改引脚号。示例代码读取UID,并将其分别以十进制和十六进制输出到串口,简化版如下:
#include#include #define SS_PIN 10#define RST_PIN 9 MFRC522 rfid(SS_PIN, RST_PIN); //实例化类 // 初始化数组用于存储读取到的NUID byte nuidPICC[4]; void setup() { Serial.begin(9600); SPI.begin(); // 初始化SPI总线 rfid.PCD_Init(); // 初始化 MFRC522 } void loop() { // 找卡 if ( ! rfid.PICC_IsNewCardPresent()) return; // 验证NUID是否可读 if ( ! rfid.PICC_ReadCardSerial()) return; MFRC522::PICC_Type piccType = rfid.PICC_GetType(rfid.uid.sak); // 检查是否MIFARE卡类型 if (piccType != MFRC522::PICC_TYPE_MIFARE_MINI && piccType != MFRC522::PICC_TYPE_MIFARE_1K && piccType != MFRC522::PICC_TYPE_MIFARE_4K) { Serial.println("不支持读取此卡类型"); return; } // 将NUID保存到nuidPICC数组 for (byte i = 0; i < 4; i++) { nuidPICC[i] = rfid.uid.uidByte[i]; } Serial.print("十六进制UID:"); printHex(rfid.uid.uidByte, rfid.uid.size); Serial.println(); Serial.print("十进制UID:"); printDec(rfid.uid.uidByte, rfid.uid.size); Serial.println(); // 使放置在读卡区的IC卡进入休眠状态,不再重复读卡 rfid.PICC_HaltA(); // 停止读卡模块编码 rfid.PCD_StopCrypto1();} void printHex(byte *buffer, byte bufferSize) { for (byte i = 0; i < bufferSize; i++) { Serial.print(buffer[i] < 0x10 ? " 0" : ""); Serial.print(buffer[i], HEX); }} void printDec(byte *buffer, byte bufferSize) { for (byte i = 0; i < bufferSize; i++) { Serial.print(buffer[i] < 0x10 ? " 0" : ""); Serial.print(buffer[i], DEC); }}
5、运行结果
依次将卡A、卡B、卡A放到RC522读卡区,串口打印信息如下
感谢梦鸽推上首页分享给更多的人看到_
【转载请注明出处:
作者:不亦
来源:CSDN 原文: 版权声明:本文为博主原创文章,转载请附上博文链接! RFID射频模块与Arduino 的连线:
 | RFID射频模块 | Arduino |
|---|---|
| 3.3V | 3.3V |
| RST | 2 |
| GND | GND |
| MISO | 3 |
| MOSI | 4 |
| SCK | 5 |
| SDA | 6 |
| IRQ | 7 |
/******************************************* * function:get the id of RFID key * RFID Arduino Uno * VCC 3.3V * RST 2 * GND GND * MISO 3 * MOSI 4 * SCK 5 * NSS 6 * IRQ 7 ****************************************/#include "rfid1.h"RFID1 rfid; //create a variable type of RFID1uchar serNum[5]; // array to store your IDvoid setup(){ Serial.begin(9600); //initialize the serial rfid.begin(7, 5, 4, 3, 6, 2); rfid.begin(IRQ_PIN,SCK_PIN,MOSI_PIN,MISO_PIN,NSS_PIN,RST_PIN) delay(100);//delay 1s rfid.init(); //initialize the RFID}void loop(){ uchar status; uchar str[MAX_LEN]; // Search card, return card types status = rfid.request(PICC_REQIDL, str); if (status != MI_OK) { return; } // Show card type rfid.showCardType(str); //Prevent conflict, return the 4 bytes Serial number of the card status = rfid.anticoll(str); if (status == MI_OK) { Serial.print("The card's number is: "); memcpy(serNum, str, 5); rfid.showCardID(serNum);//show the card ID Serial.println(); Serial.println(); } delay(500); rfid.halt(); //command the card into sleep mode } /******************************************* * name:RFID Entrance Guard System * function:first: get the id of RFID key by the getid.ino file ,then divide the ID into four parts and fill them in loop() function * swipe the RFID key ring on the RFID module. * If the password is correct, the normally open contact of the relay will be closed and the LCD will display a string “ID:5AE4C955” "hello Arduino", * and then "Welcome!" two seconds later; * if the password is incorrect, the normally open contact of the relay will be disconnected and the LCD will display a string "Hello unknown guy" , * and then "Welcome!" two seconds later * connection: * RFID Arduino Uno * VCC 3.3V * RST 2 * GND GND * MISO 3 * MOSI 4 * SCK 5 * NSS 6 * IRQ 7 ****************************************/#include"rfid.h"#include#include LiquidCrystal_I2C lcd(0x27,16,2);RFID rfid; //create a variable type of RFID#define relayPin 8 //relay module attach to pin8uchar serNum[5]; // array to store your IDvoid setup(){ lcd.init(); //initialize lcd lcd.backlight(); //turn on the backlight Serial.begin(9600); rfid.begin(7, 5, 4, 3, 6, 2);//rfid.begin(IRQ_PIN,SCK_PIN,MOSI_PIN,MISO_PIN,NSS_PIN,RST_PIN) delay(100); rfid.init(); //initialize the RFID pinMode(relayPin, OUTPUT); //set relayPin as OUTPUT digitalWrite(relayPin,HIGH); //and high level //Serial.begin(9600); lcd.setCursor(0,0); lcd.print(" Welcome! "); //print" Welcome! " delay(2000);//delay 2s}void loop(){ uchar status; uchar str[MAX_LEN]; // Search card, return card types status = rfid.request(PICC_REQIDL, str); if (status != MI_OK) { return; } // Show card type rfid.showCardType(str); //Prevent conflict, return the 4 bytes Serial number of the card status = rfid.anticoll(str); if (status == MI_OK) { //Serial.print("The card's number is: "); lcd.setCursor(0,0); lcd.print(" ID: "); memcpy(serNum, str, 5); rfid.showCardID(serNum);//show the card ID // Serial.println(); // Check people associated with card ID 8F3D0329 uchar* id = serNum; if( id[0]==0x8F && id[1]==0x3D && id[2]==0x03 && id[3]==0x29 ) { digitalWrite(relayPin,LOW); // Serial.println("Hello Dannel!"); lcd.setCursor(0,1); lcd.print(" Hello Dannel! "); delay(2000); lcd.clear(); digitalWrite(relayPin,HIGH); } //if the card id is AB8058A3,then relay connect else if(id[0]==0xAB && id[1]==0x80 && id[2]==0x58 && id[3]==0xA3) { digitalWrite(relayPin,LOW); //Serial.println("Hello Arduino"); lcd.setCursor(0,1); lcd.print("Hello Arduino"); delay(2000); lcd.clear(); digitalWrite(relayPin,HIGH); } else { //Serial.println("Hello unkown guy!"); lcd.setCursor(0,1); lcd.print("Hello unkown guy"); delay(2000); lcd.clear(); } } lcd.setCursor(0,0); lcd.print(" Welcome! "); delay(2000); rfid.halt(); //command the card into sleep mode }